
Ansible, part III – YAML and Playbooks

In the previous article, we showed how useful are ad-hoc commands. They allow us to run individual tasks on multiple nodes. Ad hoc commands are used on an ad hoc basis, hence their name. Their limitation is that they can only perform one module with one set of arguments at a time. It happens, that we need to perform a whole set of different tasks both on a large number of nodes operating at the given moment, and new ones that will appear in the future.
These tasks are much easier to write, modify and maintain in the form of a text file, which is the so-called playbook. Playbook is a set of tasks to be performed on specific sets of nodes.
By using YAML (YAML Ain’t Markup Language) to create playbooks, the whole is much more readable and understandable than single-line ad hoc commands, especially those with a lot of arguments. It should be remembered that the larger the scale, the more important is simplicity, transparency and readability. Their absence leads to increased failure rates and security problems.
Ansible Playbook is a text file with the extension “.yml” or “.yaml“. The latter is the extension recommended by the standard. Indentations are a very important element of its file structure. While their exact number does not matter, data at the same hierarchy level must have the same number of indentations (spaces), and children must have more indentation (spaces) than the parent object.
I am writing about a space character intentionally, as the tab character cannot be used for indentations. The reason for this is the different interpretations of the tab character by different text editors. The first line of playbook must contain three lines “—“, and the last line should contain three dots “…“. This last line is often omitted.
The place for “plays“, which are sets of tasks to be played on specific groups of hosts, is located between “—” and “…“. Before you start writing playbooks, it is worth spending some time getting to know the syntax and structure of YAML, as it will be the syntax and structure of our playbooks.
YAML is used to describe and represent data in an ordered and structured manner. Compared to XML, the YAML record is more concise and transparent, as well as more convenient for humans to work.
You can use comments within the YAML document. The hash “#” character at the beginning of a new line or the space and hash ” #” characters after the data are used for this purpose. Everything to the right of this sign is treated as a comment. Comments can also be placed before the “—” sign.

Variables or keys are separated from the value by a colon and space “: “:

A more compact variable mapping format is also available with curly brackets “{}”:
![]()
The string value of the key does not have to be placed inside quotation marks, even if it contains spaces. However, you must watch out for special characters that are specific to YAML syntax, such as the colon “:“. Therefore, we recommend using quotation marks for text variables. Double quotation marks “” allow the use of some special characters by preceding them with the backslash “\“, such as the newline character “\n“. A single quotation mark ” prevents the use of special characters.
When we need to write long text, consisting of many lines, it is best to use the “|” or “>” operator for this purpose. The first of these “|” preserves the newline and all trailing spaces. The leading blank characters of each line from the left are removed. An example of its use can be seen below:

The second character “>” converts new line characters to spaces ” ” and removes leading empty line characters from the left. It is most often used only for better readability. An example of its use can be seen below:

The values of logical variables (booleans) can be defined in various ways, such as: True/False, true/false, yes/no or 1/0. It is worth choosing one of the methods and consistently use it.
Each element of the same list has the same number of indents, followed by a dash and space “– “:

A more compact list format is also available with square brackets “[]“:
![]()
At this stage, we don’t need more information about YAML syntax. We have gone through the most necessary basics. We did not describe all possible ways to write the same things. We also did not refer to everything that we will need further. This is not our goal at the moment.
While there are many different ways to write the same thing, it’s a good idea to adopt a standard within the project or even the entire organization and then stick to it. Then for everyone the whole will be easier to interpret and use, which will translate into more efficient management and fewer human mistakes.
Before we start creating playbooks, let’s look at two ad hoc commands again:

You can see that they are perfect for situations when we need to check something quickly or do it on an ad hoc basis. Using them to describe individual elements of infrastructure is rather uncomfortable, and in the long run difficult to maintain and prone to errors. Nevertheless, they have their application and are needed in some situations, so it is worth being able to use them efficiently.
Now we will deal with a slightly different use of Ansible, which is describing individual infrastructure elements or automating more tasks on different groups of nodes. Playbooks are much more suitable for such purposes.
From an Ansible point of view, a single “play” is a set of tasks to play (perform) on a given group of nodes, and the file in which one or more such “play” is located is called a “playbook“. Each “play” can perform different tasks on a different group of nodes, but in total they form a whole, which facilitates orchestration of larger and more complex projects.
Each “play” can specify different settings regarding how to connect to managed nodes, including connection and escalation method, and username. If they are not specified, then the values from the Ansible configuration file, discussed in earlier articles or default values are used. The names of these parameters inside the playbook file are exactly the same. These parameters are defined at the same level (the same number of indentations) as the parameters: “hosts” and “tasks“.
As an argument to the “hosts” parameter, you must specify “pattern” to identify the nodes from the inventory on which the tasks will be performed. It was discussed in more detail in the first article on Ansible.
The “tasks” parameter contains a list of tasks to be performed. Individual tasks are performed sequentially in order of arrangement within the playbook. However, they can be performed in parallel on many nodes at the same time. The number of tasks to be performed in parallel is configurable with the “-f” or “–fork” option – it defaults to 5. For better readability, you can leave a blank line between tasks in the list.
The “name“ parameter is a label that describes the task or the entire “play” in a way we understand. As this label is for us and is visible during the operation of the playbook, it is worth ensuring that it contains clear and concise content. It should be relatively short, and at the same time reflect the purpose of the task or play. It is optional, however it is highly recommended to use it.
Below you can see a playbook with one “play“, which corresponds to the second of the above-mentioned ad hoc command:

To run the playbook, use the command:
![]()
Before starting the playbook, it is good practice to check the syntax. This can be done with the “–syntax-check” option. If such verification fails, we will receive information about the error and its location.

If the syntax is correct, you can additionally run the playbook in “dry run” mode. Then, we will get all the information about the result of the playbook as if it had been made. This way you can see what has changed and what has not changed. Of course, there are no modifications on the managed nodes in “dry run” mode. For this purpose, a “-C” or “–check” option is used.

In addition, you can increase the amount of information generated at the output of the “ansible” and “ansible-playbook” commands. The “-v“, “-vv“, “-vvv” and “-vvvv” options are used for this. Each of the following increases the debug level by 1, and thus the amount of information displayed. The default debug level is 0.
Below is a playbook containing two sets of tasks to play called “Play 1: Verification” and “Play 2: Unification“. Each of them can define many tasks to be played on different host groups. In our example, both sets of tasks will be performed on all nodes.
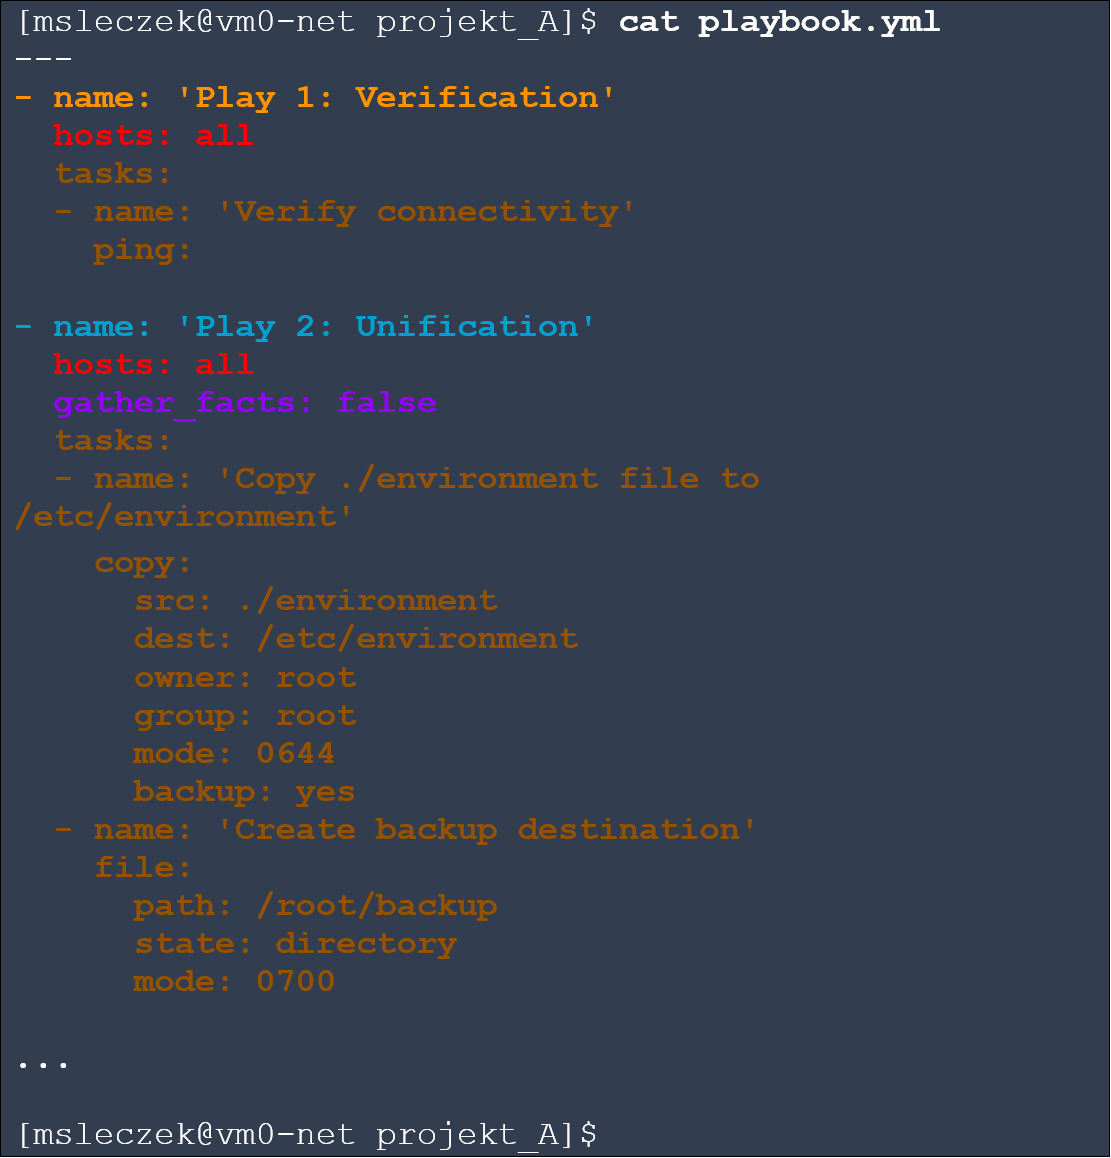
Let’s follow the syntax verification result and launch of the above playbook. We created three tasks in it, but at the bottom you can see four. The initial “Gathering Facts” task is implicitly created by running the “setup” module, which collects a large amount of information about each managed node. It allows you to perform certain tasks based on collected values, that reflect the characteristics and configuration of the node. For example, if the node’s operating system belongs to the “RedHat” family, then we should use the “yum” module for package management, and if it is “Debian”, then the “apt” module. In this way, we can build more universal and dynamic playbooks.
Gathered in this way information are called facts. If they are not needed for anything, it is worth to turn them off. In this way, our playbook will perform much faster. This can be done by setting the “gather_facts” parameter to “false“. This was done in “Play 2: Unification“. Please note that unless explicitly turned off, this information will be collected by default at the beginning of each set of tasks to play.

In the previous article, we have already mentioned idempotence. Every playbook task should work in such way and if we only use specialized modules that are supplied with Ansible, it is so. However, when we use some of our own modules or use more universal modules, such as “command“, “shell” or “raw“, we should take care of it by ourselves. The expressions available as part of the playbook allow this, but it requires additional work. In the end, if only we followed the rules, then playbook can be run many times on the same set of nodes, without any negative effects.
So is with our playbook, which on some nodes performed all tasks, on another part of the nodes several tasks, and on the rest of the nodes did not have to do anything at all, because they were already in the right condition. Despite this, it was launched without fear for all nodes.
In order to better direct our attention, Ansible uses different colors in the returned results. These include:
- “task failed”,
- “made changes”,
- “nothing had to be done”.
When it is possible to use several colors, the one that refers to the events to which we should focus our attention will be used. At the bottom is a summary of all task sets – “PLAY RECAP“.
09:00 AM, Aug 26
Author:

CEO, Network Engineer and System Administrator at networkers.pl
Marcin Ślęczek
Marcin works as CEO, Network Engineer and System Administrator at networkers.pl, which designs and implements IT Systems, Data Centers and DevOps environments. networkers.pl also sells software and hardware for building such environments and is a partner of well-known manufacturers such as Red Hat, Cisco Systems, IBM, Storware and VMware.