
Ansible, part I – basics and inventory

Making changes manually is tedious, and problematic in terms of documenting. Ansible addresses both of these problems. It’s great for what we don’t like. It is doing the same thing on many elements. In addition, the resulting YAML file becomes a form of documentation. It certainly will not replace the typical documentation with diagrams, tables and additional notes. However, it is a good reference point when we want to check what has been configured.
Ansible allows you to describe the infrastructure and its services using code (IoC – Infrastructure as Code). If we additionally take care of appropriate comments and order in the file structure, Ansible can replace quite some elements of typical documentation, especially dynamic ones that require frequent updates.
Creating such a code may seem like a big investment of time, but it is not at all, and it will pay off in the long run. When we need to configure further infrastructure elements in a similar way, it can easily be done. Without a thorough analysis of the configuration of what is already there and without fear of missing something.
Of course, good knowledge of what we automate is important. No tool can replace it. That’s why it is better, when this is done by experienced experts in a given field. Everything else related to using Ansible is very simple.
While Ansible can be used to automate various components, this must be done from the GNU/Linux system. In our example, this will be exactly RHEL (Red Hat Enterprise Linux). In the RHEL8 system, this requires activation of the selected repository and a typical installation of the package:

Before we start automating, we must define the inventory on which we will operate. In its simplest form, it can be a static text file in INI or YAML format. There is also the possibility of using a dynamic inventory. Inventory data is then taken from other solutions, such as Red Hat Satellite or through dynamic scripts from various databases.
The inventory contains a set of nodes, such as devices or servers, which can be grouped in any way. They can belong to many groups at the same time or not belong to any of them. Other subgroups can also be members of one group. There are two built-in groups “all” and “ungrouped“. The “all” group implicitly contains all nodes from the inventory, and the “ungrouped” group implicitly contains all nodes from the inventory that are not members of any other group. Inside the inventory, you can define variables associated with groups and individual nodes. While we used here the term nodes, Ansible uses the term hosts in its place, regardless of whether these nodes are servers, a network device or something else.
You should not use “-” in group names, and the same host and group names in the inventory file. In the latter case, the group name will be omitted and only the host will be included. Group names should only use letters, numbers and “_”, the number cannot be the first character of the name.
Most often, the INI format file is used to build the inventory. We will also use it in most examples. Its simplest form is a list of IP addresses and domain names (one per line).

The INI format allows you to create sections by using square brackets “[]“. This is how you define groups. Each section is a separate group. The section name corresponds to the group’s name. Groups are used very often, because we usually want to perform specific tasks on a specific group of hosts. An example inventory file is shown below, which allows convenient operations on all servers with a specific function or located in a given data centre or operating in a given environment.

As you can see above, practically any grouping method is allowed. We also mentioned the possibility of creating nested groups, consisting not only of hosts but also of other groups. The “:children” suffix is used for this purpose, which is added to the group name.
An example of using nested groups can be seen below, where the “web_servers” and “db_servers” groups belong to the “db_and_web” group, and the “web_servers” and “db_server” groups and two hosts “10.8.232.61” and “10.8.232.62” belong to the “production” group.

As you can see above, while the group can contain hosts and other groups, they are added in different sections.
Group membership can be verified using the command:

Below, we use the “-i” option to indicate the inventory file named “inventory“, and the “–list-hosts” option to display hosts belonging to the given group. As you can see below, the “web_servers” and “db_servers” groups have 2 different hosts:

Thus, 4 hosts belong to the “db_and_web” group, as the “db_servers” and “web_servers” groups are its members:

The “production” group includes 6 hosts (2 from “web_servers“, 2 from “db_servers” and 2 from “production“):

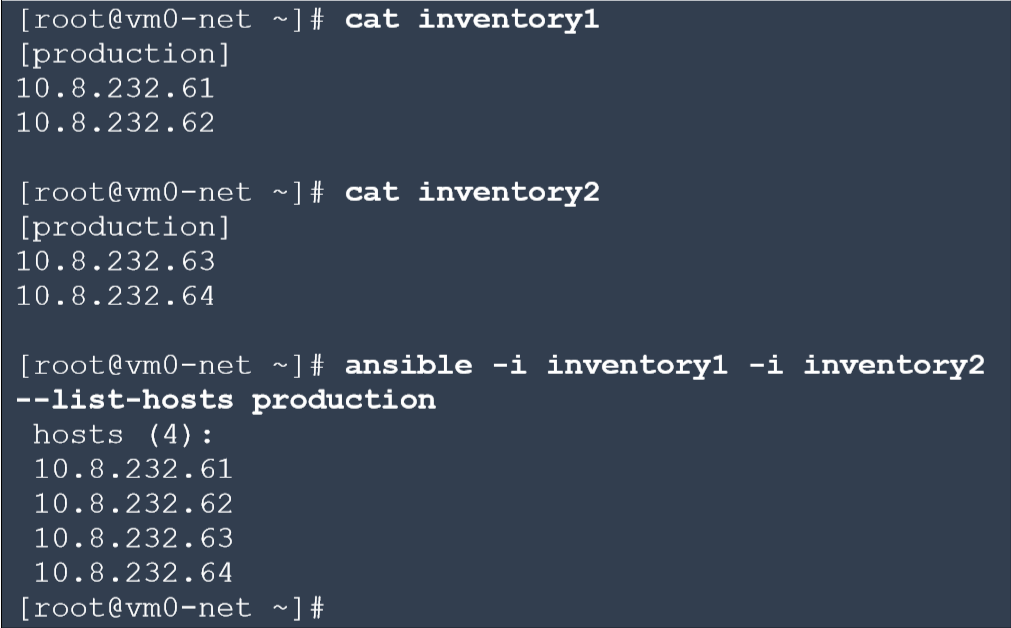
You can also use several inventory files and then operate on a combined set. This applies to all groups.
Let’s return to the aforementioned built-in groups: “upgrouped” and “all“. The first contains 4 hosts located at the very top of our inventory file, in the place where hosts not belonging to any groups are defined.

And the second contains all the hosts that were defined in the inventory file.

Our file can also be slightly simplified using the “[START: END]” range in the host name or address:
• 10.8.232.12[0:9] – IPv4 addresses from 10.8.232.120 to 10.8.232.129.
• 10.8.22[4:5].[0:255] – the entire subnet 10.8.224.0/23, IPv4 addresses from 10.8.224.0 to 10.8.225.255.
• 2001:db8:c1sc0::[a:f] – IPv6 addresses from 2001:db8:c1sc0::a to 2001:db8:c1sc0::f.
• web[1:20].networkers.pl – FQDN from web1.networkers.pl, through web8.networkers.pl to web20.networkers.pl.
• web[01:20].networkers.pl – FQDN from web01.networkers.pl, through web08.networkers.pl to web20.networkers.pl.
When comparing the last two examples, it is worth noting that leading zeros are left in the pattern.
The simplified version of our previous inventory file looks like this:

Verification of its correctness is below:

You can also add comments to the inventory file. Each comment line should start with a “#“.
While the default location of the inventory file is “/etc/ansible/hosts“, it is not used in practice. Usually, a file is created in the project directory and then selected by the “-i“, “–inventory” options or through the “ansible.cfg” configuration file setting.
The location of the used configuration file can be checked using the “ansible –version” command. Below you can see that this is the “/etc/ansible/ansible.cfg” file.

This is the default file that can be overwritten with “~/.ansible.cfg“. If we need a different configuration for each project, then they can be overwritten with the “./ansible.cfg” file, in the directory where the “ansible” command will be executed. You can also use the “$ANSIBLE_CONFIG” variable, which is useful when we use many configuration files and do not want to move between different directories.
The search order for the Ansible configuration file is summarized below:
1. “$ANSIBLE_CONFIG“
2. “./ansible.cfg“
3. “~/.ansible.cfg“
4. “/etc/ansible/ansible.cfg“
Thus, the default configuration file is only used if no other is found. The best practice is to use the “ansible.cfg” file in the directory from which we run the “ansible” command.

Please note, that the file indicated by the “$ANSIBLE_CONFIG” variable must exist. If Ansible can’t find it, it will go to the next place, which is “./ansible.cfg“. This can be seen above when we deleted this file before the “$ANSIBLE_CONFIG” variable was deleted.
Additionally, Ansible will not load the “ansible.cfg” file from the current directory if that directory has world-writable permission. This is for security reasons, because another user may have tossed a properly crafted file there. If for some reason, that we need to use such a directory, it will be required to put the path to it in the variable “$ANSIBLE_CONFIG“. However, it is a good idea to think about it beforehand and consider the resulting security risk.
The Ansible configuration file is in INI format. It consists of sections defined by square brackets “[]“, which contain settings in the “key = value” format. The two most commonly used sections are:
• [defaults] – default Ansible settings,
• [privilege_escalation] – defines how Ansible escalates permissions on managed hosts.
In practice, this file is created to indicate the inventory and the methods to connect to hosts within a given project. An example of the contents of the “ansible.cfg” file in this respect can be seen below.

The names of the parameters are so intuitive, that they indicate their use directly:
• inventory – path to the inventory file (you can overwrite “-i” or “–inventory“).
• remote_user – username used during login process (current user by default).
• ask_pass – whether it should ask for a password (if used public key for SSH, it should be “false“).
• become – whether to escalate permissions automatically (default “false“).
• become_method – method used to escalate permissions (default “sudo“).
• become_user – user to which the escalation takes place on the managed host (“root” by default).
• become_ask_pass – whether to ask for a password during escalation (default “false“).
Thanks to the appropriate configuration of this file, you don’t have to enter all the parameters, which makes work more convenient. For example, it can be seen below that we no longer have to indicate the inventory.

This is the syntax of the command we use to verify the inventory:
![]()
Until now, we have provided single hosts or groups in “[pattern]“. However, this can be any pattern, which will be further adapted to the objects defined in the inventory. It may consist of many elements which are separated by “:” or “,“. Special characters such as “!“, “&” or “*” may also appear in it. In these cases, the pattern should be placed inside a single quotation mark – ‘pattern‘ – or preceded by special characters using the backslash character ‘\‘. Actually, you can always specify the whole pattern in a single quotation mark – ‘pattern‘ – then it will be universal, and you won’t encounter any problems.
Examples of commonly used matching patterns are:
• host1:host2 or host1,host2 – sum of hosts (multiple hosts).
• web_servers:db_servers or web_servers,db_servers – all hosts from both groups.
• production:!db_servers or production,!db_servers – all hosts from production, but without those from db_servers.
• production:&db_servers or production,&db_servers – all production hosts that are in db_servers.
• *networkers.pl – all inventory objects with the name “networkers.pl” at the end.
• 10.8.232.* – all inventory items having the name “10.8.232.” At the beginning.
Before we show you how these patterns work, let’s check our inventory:

The list of hosts or groups in the ‘pattern’ does not have to be limited to 2 objects:

Below you can see the sum, difference and intersection of the two groups of sets:

The ‘*‘ sign enables convenient matching to parts of a given pattern. In this way, you can easily refer to hosts working within a specific domain or having specific IP addresses. The given patterns must match the objects in the inventory. So, if we give everything by name, then the attempt to search by IP addresses will fail.
Below is an example of the use of ‘*‘ in the formula with the name and IP address (please note that this is a special character):

Previously obtained results can be further narrowed, creating more complex patterns:

Some of the more complex patterns can be quite useful. For example, we may want to perform operations on all web servers and databases that work in a production environment but are not located in a western data center:

You can also use regular expressions as part of the pattern. To use them, precede the pattern with ‘~‘. Many special characters can be used in this pattern, so it’s best to enter it in single quotation marks.

You can also refer the hosts by their position number within the given group. The square brackets “[]” are used for this purpose. This way you can indicate both the item number “[POSITION]” and the range “[START: END]“. The position numbers within the group start at zero.

Mastering the rules of using the inventory and the Ansible configuration file is a necessary basis for further work. Lack of knowledge in this area will be behind us all the time, which is why we recommend taking the proper amount of time to these topics before moving on to the next articles.
10:05 AM, Jun 08
Author:

CEO, Network Engineer and System Administrator at networkers.pl
Marcin Ślęczek
Marcin works as CEO, Network Engineer and System Administrator at networkers.pl, which designs and implements IT Systems, Data Centers and DevOps environments. networkers.pl also sells software and hardware for building such environments and is a partner of well-known manufacturers such as Red Hat, Cisco Systems, IBM, Storware and VMware.